September 24, 2018

Fall Home Tour 2018


Welcome to my home for a tour of my dining room and living
room decorated for Fall. Those are really the main rooms I 
change the decor out seasonally. I like to have a seasonal 
vignette on my kitchen table too but I'm reserving that for
more of a Halloween theme this year...that will be later.

Come on in through the front door into an open space that 
is kind of a combo foyer and dining room. 


A French buffet holds two lamps made from orange 
terracotta garden urns. The artwork in the frame changes
seasonally. Right now it is an art print that has had clear 
artist medium added in brush stroke patterns to mimic
a painting ("how to" here). 

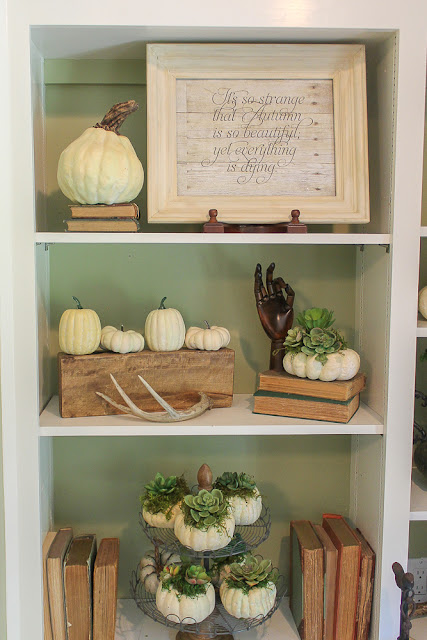
A planter holds one of my main design elements for this Fall,
succulents. The planter has antlers on either side for a Fall touch.

To your right is the dining room portion of the space. 

I finally got up enough nerve to paint the antique hutch with
Annie Sloan Chalk Paint. (see that process here).
The dining room chairs are next on my list to be painted.

The centerpiece on the dining room table is a large white
faux pumpkin. It is topped with faux succulents so there
is no upkeep required to keep these looking fresh all season. 

As you can see through the hutch glass, the pumpkins and
succulents are my main decorating theme this year. 

Last year I also used the faux pumpkins and faux succulents
to decorate for Fall. I kind of went wild with the look after
I found a lot of the faux succulents on a clearance sale.
Fall 2017

I think they might have been on clearance because the colors
were not the most appealing. I told myself that there ARE
real succulents those colors and used them as they were. 
Fall 2017

However, I never got used to the colors. This year before I
used the faux succulents again, I painted the ones that did
not look real to me so I am happier with the look this year. 
If you would like to see that paint process click here.

If you want to see tips on how to combine the faux pumpkins
 and faux succulents together click here. 

Now we'll move on to the living room...

The upholstered furniture pieces are neutral colors so it is
 easy to change out the pillows and throws as the seasons change.

This year for the coffee table I used a tray (from Walmart
that looks like wood but actually is a plastic or resin) to
hold books, a real Casper pumpkin, faux antlers and faux
succulents in pots. 

The main focal point of the room is the fireplace, mantel and bookcases.


This framed picture is also an art print brushed with 
clear artist medium to replicate a painting. If you want
to see how this print was done you can click here.

The candle holders are topped with more succulents and
pumpkins. The candle holders came from a garden center
gift shop...they look very old but might be reproductions.

To the left of the fireplace is the single bookcase.

I find myself using mostly white accessories during most
of the year so I tried bringing darker items out of the attic
for decorating this Fall. 


To the right of the fireplace are the double bookcases.

I used to have lots of books on the bookcases but have 
gradually thinned out my collection and moved most of
what I kept to the office area. Now the shelves are mainly
used for seasonal decor. 


Straight across the room from the sofa is a credenza that
holds the radio and CD player. It was a thrift store find that
my husband refinished the wood on top and I painted the
bottom white. 

The large blown glass candle holder on the credenza
holds a small pumpkin on a bed of moss.

The framed chicken wire above the credenza was originally
made to hold Christmas cards but I've ended up keeping it
up all year and changing out the subject matter seasonally.

Here are the Fall quotes I made into faux wood signs
for the chicken wire this year...


 These quotes' text are below as jpegs if you want to
 download them like photos and print them at home.

I glued the printed out quotes on to foam core but
you could also frame them in a 8"x10" frame.
The wood paper I used is kind of "busy"...the quotes 
would probably be easier to read on a less patterned paper. 


This quote was framed and used on the double bookcase. It is horizontal. 

Thank you so much for coming to visit!


Suggested Pinterest Image


How To Change The Color of Faux Succulents


Did you know that you can change the color of faux succulents?

Succulents are so amazing that they look almost "other worldly"
or even not real...but I touch them and discover, yes they ARE
real. I am not good at keeping any plant alive so usually I 
like to buy artificial succulents that LOOK real.
 The plant in the middle is a pot of real succulents I am hoping to keep alive.
The fake succulents on the left are ones that I do like the color of.
I probably got them one at a time using a discount coupon at craft stores. 
 The fake succulents on the right were a great bargain but I don't really like to colors.

Sometimes I come across really inexpensive fake succulents
 that have good shape but are  not a color that my eye is used to
 seeing so it LOOKS fake to me. If this happens to you, now
you can buy the succulent and change its color to what you like.

I couldn't resist buying a bunch of faux succulents marked 
down 80% last year at Michael's even though I was not in
love with the colors. I told myself that somewhere in the world
there are real succulents those colors. I used them in my Autumn
decorating on top of faux pumpkins that I had painted white.

I thought I could learn to like the faux succulents just as they 
were...but I did not. The colors bothered me all season.
Autumn 2017

So this year my painting project was not faux pumpkins but
faux succulents. I tried to "google" how to do it but the only
results I found were how to paint real succulents.

Here are my attempts at changing the colors of some
of my faux succulents...

I've had good luck in the past making my own chalk paint
out of plaster of paris and acrylic paint. (Click here for recipe.)
For some reason, the plaster in the mix makes the paint
stick to almost anything. Since the surface of the faux
succulents is rubbery, I thought the plaster would help.
The plaster is very cheap and can be found at any craft store. 
The dots in the above photo are the bottoms of bottles of acrylic craft paints 
that are candidates to be used on the succulents.

A chalk paint recipe is usually about 1 part plaster to 3 parts
paint then thinned with some water. I started out with about an
 even amount of plaster and paint for this project. 

I didn't totally mix the entire amounts of the three ingredients together on the plate...just pulled a little of each together
 with a wooden skewer and stirred together in the middle. 

What seemed to work best was little bit of plaster, some paint and some water. If I kept the paint fairly thin with water, some of the
color variation from the original faux succulent could show through. That helped the succulent from being just one color. 

I used a regular craft paint brush to put the paint on the leaves.
It seemed to be better to start at the bottom and work my way up.

I thought I was going to like the light green paint best but after
 I had painted a few succulents with it, they seemed a little too
 yellowish. At least I knew I did not want all of them that color.

In the beginning I was painting the back and the front of the
flat succulents. Then I got lazy and told myself the bottoms
would not show so I only painted one side.  Big mistake.
When I was arranging the succulents, the bottoms showed
way more than I thought they would. Paint both sides. 

I added a darker green color the the plate palette for variety.
I actually liked it better. I added some of it to the ends of the
leaves on the ones I had already painted and painted other 
succulents with mostly the darker green. 

I also like purple succulents. The purple that I had
 in my paint stash was not quite right straight out of the bottle.

 At first I added a brown paint to the purple which turned out 
almost pink on the faux succulent...
 not terrible but I wanted a darker purple.
 By adding black paint to the purple, I got a color I liked.
Succulents on the left side of the plate have been painted;
 the right side has not been painted. 

Here are the colors of acrylic paint that I ended up using the
most in painting the succulents...Americana Avocado, Craft
 Smart Spanish Olive, Color Traditions Wrought Iron and Color 
Traditions Pansy Purple. By combining and layering these colors
I was able to get a lot of different looks on the fake succulents. 

 To get ideas on how you want to paint your fake succulents
just "google" images of succulents...so much variety!

You can use faux succulents all year in your decorating so
paint them in colors that appeal to you and enjoy them. 

I hope you are happy with your painted faux succulents at
this point if you have tried this technique. If you don't have
plaster, try painting the faux succulents without it...the 
paint by itself may do just fine in adhering.   

If you think the paint looks kind of "flat" or you want to 
protect the paint, you can paint a clear "satin finish"
sealer on the succulents. Small amounts can be purchased
in the same area as acrylic paints at a craft store. 
Before Sealer                                                                      After Sealer

If you already have some clear wax on hand, an alternative
to the satin sealer is to rub wax on the succulents.

Smash some of the wax with a fork (you can throw away a plastic
one) until it is soft. I thought I would be able to brush the wax
on but rubbing it on the leaves with my fingers was best.
Succulent on the left has wax; one on the right is waiting for it's wax massage. 

On some, but not all, of the waxed succulents whitish spots 
showed up a couple of days later. I think it was due to leaving
too much wax on the leaves. Usually when you wax over chalk
paint to preserve the finish, you go back and buff it down later.
I didn't do that to the faux succulent leaves. 

If the white (on purple above) or yellow (on green above)
 bothers you, here is a fix...
Scraping the white (too much wax? too much plaster?) 
with the tip of a wooden skewer and then buffing the leaves 
with a lint-free cloth helps a lot.

Another trick I tried to speed up the excess wax removal was
to heat the succulent up with a hair dryer first. Stop the heating when you see the wax get shiny then immediately rub it. 

A little bit of the color you painted on might come off but it
just helps the succulent have more depth of color. 

Here's how I used some of my refurbished faux
succulents in decorating for Autumn this year...


If you would like to see more of how I used the painted 
succulents for Fall, click on this link...
Fall Home Tour 2018.

I might have made this painting of faux succulents more 
complicated than it is with the plaster, sealer, wax, etc.
If you want to give this a try and all you have on hand is 
acrylic paint, just try that on a faux succulent to change 
the color...see how it comes out for you!

If you want to see the "how to" of putting faux succulents on
top of faux pumpkins for a carefree Autumn look , please 

Here is a good Pinterest image if you would like to
save this idea to one of your boards. 


© Miss Kopy Kat. Design by FCD.