July 23, 2012

Striking Shell and Coral Display

Since Summer is into it's third month soon, I need to hurry up
and share some more beach decorating ideas with you before
it is too late.  This vignette in the dining room features a coral
that was purchased this year.  I also added some sea shells
into the mix to carry out the beach theme even more.

shell decorations

After being in the attic for almost a year, the coral arrangement
needed a little sprucing up with some sea shells for its base.
How to make coral

Some candlesticks that I already had also got a dose of shells
to help carry out the shell decoration idea.
how to make shell decorations

The new print in the old frame also helped to carry out the
shell decoration theme for this display.  The colors in the
 print unexpectedly went well with the lamps.
how to make beach decorations

Initially, I tried the cloche directly on the buffet but it
looked unfinished.  I was looking for a cream colored
stand for the cloche to sit on but when I came across this
gold plate, I decided that it would "do" and also it
would pick up the colors of the shells in the print. 
shell decoration

The shells are just placed on the plate for Summertime.
decorating with shells


coastal decorating

The shells attached to the base of the coral added another
dimension to the arrangement and enhanced it.
coastal decorating


coastal home decor

how to make shell candlestick

The shells added to the candlesticks may not have been
necessary but they reminded me of "Sailor's Valentines".
seashell decorating ideas
Sailor's Valentines were late 19th century decorative keepsakes.  They were elaborate arrangements of
seashells glued onto wooden boxes and were given by the sailors to their loved ones when they returned from the sea.

seashell decorating idea


sea shell art

One of my favorite things about the cloche is the
reflection/distortion of objects that you look at
through the glass knob on the top of the cloche.
sea shell cloche

I am sharing this post at
Summer Cloche Party @ A Stroll Thru Life
Open House Party @ No Minimalist Here
Getting Crafty With It @ Krafty Kat
Cowgirl Up! @ Cedar Hill Ranch
Wow Us Wednesday @ Savvy Southern Style
Wicked Awesome Wednesday @ Handy Man Crafty Girl
Weekend Bloggy Reading @ Serenity Now
Seasonal Sundays @ The Tablescaper

July 19, 2012

A Homemade Chalk Recipe To Try

home made chalk paint

A dark color mirrored screen in my dining room seemed to be
calling out for a lighter, brighter color for Summer.
I have loved the turquoise furniture that I have been seeing
on Pinterest lately and wanted to give the screen that shot of color.
Here is a photo from this past Spring where the screen is in the background.

I have used and enjoyed painting with Annie Sloan Chalk Paint
but I don't have a dealer in my town.  I have seen other
 DIYchalk paints on Pinterest with various ingredients but I
didn't have all of those on hand when I got "the bug" to paint
the screen a happier color.  What I did have was some left over
wall texture powder and some latex paints.  The wall texture
powder looked like plaster of paris and the main ingredient was
calcium carbonate (both of which some people use for chalk paint).

The "recipe" I found that worked well for me was:
1 ounce of latex or acylic paint
1 heaping tablespoon of powdered wall texture
1 tablespoon of water

I mixed the paint and powder together first. 
 When it started getting too thick to blend anymore,
I added the water.

Try to smash any lumps of the powder up.  You can
 adjust the amounts of ingredients if needed.
  Some folks like a thicker or thinner paint.

If you are painting a larger piece, use the same proportions
but just mix up a bigger batch of the home made chalk paint.

This screen has been painted several times in the past.
All I did to prep the screen for this painting was to dust
it well and tape off the mirrors with Frog Tape.

The 8 oz. flat latex Valspar paint samples are available
 at Lowe's for only $3 each.  They have good colors pre-mixed.
I like all of the blue/green color samples but wanted
the overall look to be more on the turquoise side so
the light green was painted on for the first coat. 
 I am on a layered color technique kick right now. 
  You could paint a project in one color with this paint mix.

The second color painted on in blotches was the light blue.
It was also mixed with the wall texture and water.

At Haven, I was able to purchase a "Miss Mustard Seed" t-shirt
from her...she only brought a few.  She said that she used to sell
them in her space at Luckett's and may have them re-printed.
Just having Marion's t-shirt on made it more fun painting.

The Valspar turquoise was pretty...

...but I wanted it MORE turquoise so I also used the "recipe"
with craft paint in the same ratio of paint/wall texture/water.
The craft paint color was called "Bahama".  Using craft paint
 opens up a big range of colors that can be made into chalk paint.

After sanding the screen to blend the colors together,
I rubbed on a coat of clear Johnson's paste wax (at most stores).


                 The paint dried pretty quickly after each coat
and seems to stick well. Its does sand pretty easily but 
I was in a hurry to finish this screen and had to
 change from the 120 grit sandpaper to 60 grit
to get quicker results due to the paint's good adhesion. 
  The wall texture does have a small amount
of mica in it so don't sand a large piece of furniture in a
small area (or if you do, wear a mask to limit inhalation).


I was happy with the blend of colors that emerged.
The screen now reflects the "cousin color" that was
painted in the hutch portion of newly painted chest
that is also in the dining room.


The mirrored screen also reflects the new cream
colored chandy and table center piece.


I tried this same paint "recipe" on another small project
(faux lobster trap floats) and was pleased with the results.
                                                                                                                                                                        
If you try this homemade chalk mix, attempt it on a small scale
at first to see if it works for you and/or if you need to
"tweak" the "recipe" to get the look you want to achieve .

Just FYI:
I did not have to sand or prime my piece to make the
paint mix adhere but a slick surface might require that.

I only mixed the amount of paint at a time that I could
 use within the hour. If the paint started to get too thick
I would just add a little more water and mix it in.
I don't think this mix could
 be pre-made and saved for future use.

          The wall texture can be found in the sheetrock section
 of home improvement stores. The box I have was $14 for a
15 pound box...maybe they make a smaller box now.

                                                               I am sharing this post at 
Anything Blue @ The Dedicated House

July 17, 2012

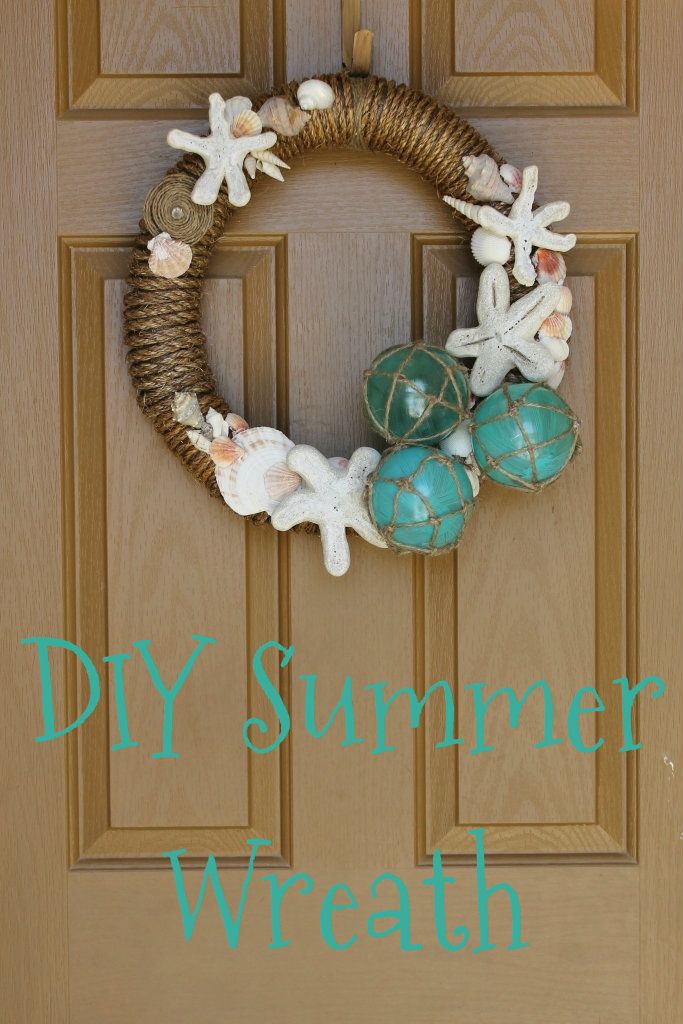
A Summer Wreath

In case you are like me and not getting to go to the beach this
summer, here's how to make a summer wreath that will bring
the beach to you.  I used some ideas that I saw on Kim's
blog Sand and Sisal to make this wreath for my mom's house.
DIY summer wreath

For the base of the wreath I used a foam pool noodle curved
into a circle and secured with packing tape to hold the shape.
The  front side of the noodle wreath was painted a combination
 of browns and yellows to cover up the green color that  would
have showed between the rope wrapping.
You could use another type of wreath like straw and not
have to paint the form.

A length of 1/4" sisal rope was glued onto the back of the
foam wreath with foam glue to securely attach a loop for
hanging.  A combination of 1/4" sisal rope and 3/8" sisal
rope was used to wrap the wreath and cover the foam.
pool noodle wreath

The larger rope was used in sections on the top, sides and bottom
but you could just use one size of rope if you wanted to.
This took a lot more rope than I thought it would.  I think
with the two types of rope, it took about 100 feet all together.
rope wreath

    To cover the form near the hanging loop, I used a smaller twine.
summer wreath

You could use a variety of beach related items on the rope
wreath, but I just loved the faux fishing floats that Kim used
on her wreath and used her tutorial to make some. 
 I did alter her tutorial a little and used some twine, simple knots
 and hot glue to fashion fake "netting" around the "floats".
how to make fake fishing floats

If I was making another wreath like this one for myself
(which I just might do), I would make the fishing floats
smaller... they were a little too big for the size of
the wreath.  I didn't think about that when I was buying
the supplies to make the floats.

     Along with the floats, I added sea shells from the Dollar Tree
 star fish wreath

                 Hot glue was used to attach the shells...
shell wreath

... wire to attach the star fish and floats.
summer wreath

sea shell wreath

coastal wreath

how to make a summer wreath

how to make a door wreath

Even though the star fish aren't real and the floats are
a little too big, the wreath looks beach-y and fun
from the street on my mom's front door.
how to make summer wreath

beach wreath


© Miss Kopy Kat. Design by FCD.