These Thanksgiving Thoughts that you can print out at your
home or office are a twist on the printables I have seen
offered by other bloggers in the past three years.
They provide beautiful printables with color backgrounds,
fonts, etc. already built in. But what if you are like me and
get sticker shock when you buy color cartridges for your
color printer? I avoid printing on my color printer because
it costs so much. Or you might only have a laser or ink
jet printer that only prints black.
With these printables the text will be black but you provide
the color by the paper that you choose to print on.
Most scrapbook paper is cheap compared to color cartridges.
Each of these scrapbook papers was only 18 cents a piece on sale at Michael's.
Another advantage of this type printable is that you get to
choose the color and feel (traditional, contemporary, etc.)
of the printable to match the decor of your home by the
paper that you choose.
Some scrapbook papers come in the 8.5" x 11" size that most
home printers accept. There is a larger selection of papers in
most stores of the 12" x 12" size, however. All you have to do
if you like a larger size in a paper is to cut it down to the size
of paper that will run through your computer.
Measure and draw lines on the "wrong side" of the paper
if there is one. If the paper has a white edge for information
purposes, be sure to note that you are cutting that end off
and not the "good" end.
I spent literally hours trying to figure out how to make a
printable that you could just print off of the computer
screen but I was not successful. Well, you CAN print these
off of the screen without downloading them but (at least in
my trials of doing that) they were on the edges of the paper
I like to have control of the margins of the things
that I print and you probably do too.
So, the best way to use these printables is to
download them to your computer. Hover over the printable
in this blog post with your computer mouse. An option
should come up that says "Save Image As". Click it.
For example, the printable that looks similar to a proclamation
in 1723 is titled "Thanksgiving Proclamation". You can
change the title of it for your computer, you can by typing
another title in the "name" box. Then hit the "save" button.
I ended up making these text printables in Pic Monkey's
"design" mode. Your computer will read the printable as
a picture in jpg. format since Pic Monkey is a photo
editing site.
On my computer I can look at the "Download" section
to find the file on my computer...is yours the same?
I can click "show in folder" to see it's icon in the download file.
If I want to move the printable to another file so I can remember where it is easier for future use, I can highlight the individual printable's icon in the download file by clicking on it, hold down the "control" key and the "c" key
at the same time and then hit enter. Then go to the file that I want to move it to.
I hold down the "control" key and "v" key at the same time and hit "enter" to move it.
When the printable is on the screen, go to the button where
your computer says "print". Mine is under the "file" tab.
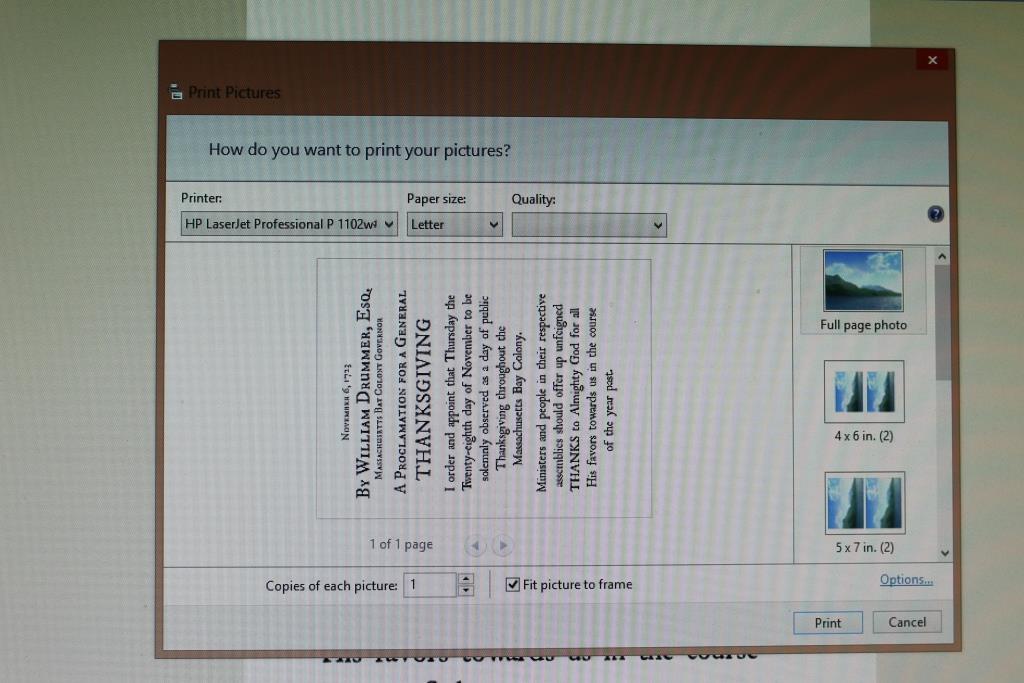
Since these printables are in jpg. the computer sees them as
a photo. In the screen shot below it shows me how the
printable would look if I print it in "full page" mode:
.JPG)
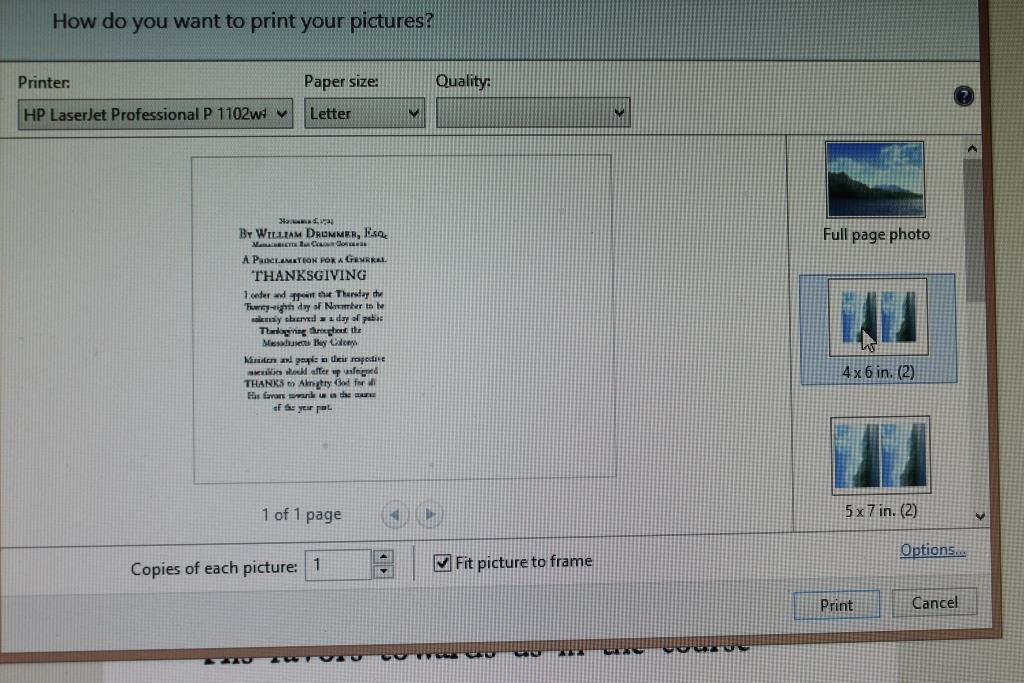
Here's how it will look on the paper if I print it as a 4"x6":

When the printable is on the screen, go to the button where
your computer says "print". Mine is under the "file" tab.
Since these printables are in jpg. the computer sees them as
a photo. In the screen shot below it shows me how the
printable would look if I print it in "full page" mode:
.JPG)
Here's how it will look on the paper if I print it as a 4"x6":

I found out that if I want the printable to be put in a frame
that holds a 5"x7" picture, the printable looks better printed
out in the 4"x6" format so that there is some space
around the edges of the text.
that holds a 5"x7" picture, the printable looks better printed
out in the 4"x6" format so that there is some space
around the edges of the text.
Here's how the proclamation looks printed on the
antique-looking paper as a full sheet coming off the printer:
Since the paper is 8.5"x11", it needs to be trimmed down
if it is going to be put in a frame that holds a 8"x10" photo.
Keep the paper the 8.5"x11" size to run it through the printer
so it won't slip side to side while printing and then cut it to
the size you need if you are putting the printable in a frame.
If you are printing the sayings/thoughts in the smaller sizes
you can get more than one on a sheet of paper if you turn the
paper on different print runs. You might want to do a test run
on a blank sheet of cheap white paper first to figure out
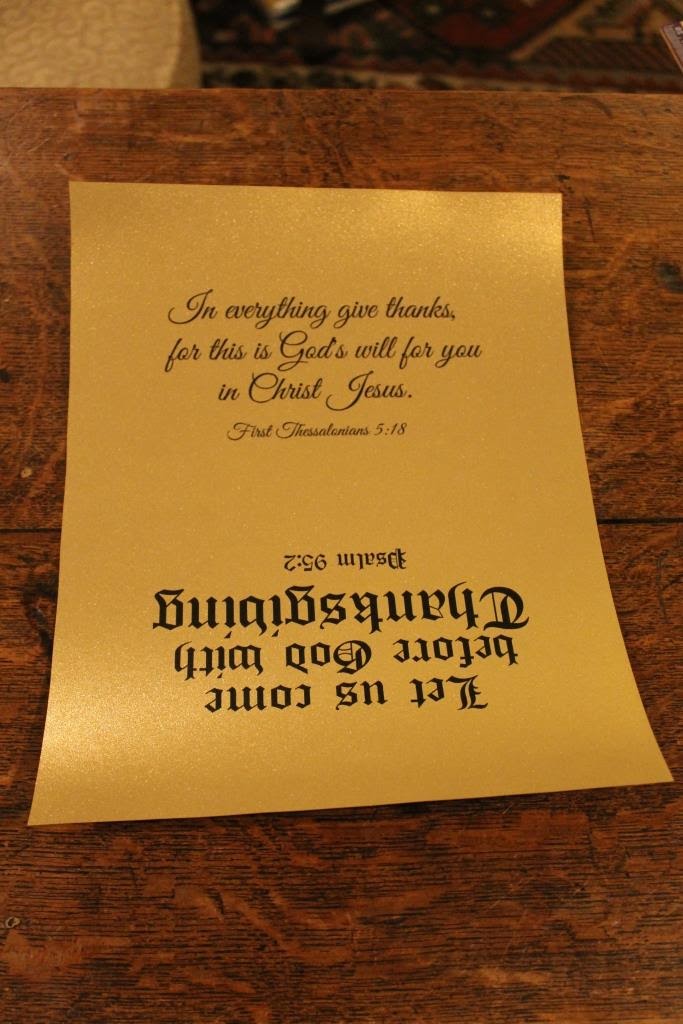
how to turn the paper so you don't do an over-print like this:
I wasn't sure that the ink would stick to the
metallic-colored scrapbook paper but it did.
So I used the other end for another printing.
They will be cut apart and used separately.

An easy way to decide where to cut the paper to center the
text in a frame is to use the picture or cardboard filler that
comes with the frame as a template. Hold them behind the
printed out text up to a light source to see where you
want to cut the paper.
this is a bad and fuzzy photo...I was trying to be the hand model and photographer at the same time
If the paper is too thick to use the light source trick, you can
still use the frame's original innards to help decide where
to cut your paper by moving it around on the front side.
You can vary how your printable looks by the type of paper
and frame that you choose.
They will be cut apart and used separately.

An easy way to decide where to cut the paper to center the
text in a frame is to use the picture or cardboard filler that
comes with the frame as a template. Hold them behind the
printed out text up to a light source to see where you
want to cut the paper.
this is a bad and fuzzy photo...I was trying to be the hand model and photographer at the same time
If the paper is too thick to use the light source trick, you can
still use the frame's original innards to help decide where
to cut your paper by moving it around on the front side.
You can vary how your printable looks by the type of paper
and frame that you choose.
Of course, you don't have to frame the printables. You can
prop them up against other accessories...
...or scatter them in vignettes or on your Thanksgiving table.
Here are the printables to download and use as a quick,
easy and very inexpensive way to add some last-minute
thankful quotes/verses to your home:
.............
..........
..........
..........
..........
..........
..........
..........
.........
..........
This is my first attempt to offer printables...I hope that it
works for you...it did in my test runs. If you want to see
the main way I used these thoughts and verses in my
home you can click on the following highlighted
text to see the blog post
I hope you have a blessed Thanksgiving week!
I am sharing this post at these blog parties:
A Stroll Thru Life's Inspire Me Tuesday
Savvy Southern Style's Wow Us Wednesday


.JPG)
.JPG)
.JPG)
.JPG)
.JPG)
.JPG)
.JPG)


.JPG)
.JPG)
.JPG)
.JPG)
.JPG)
.JPG)
.JPG)
.JPG)


So beautiful!! Thank you for providing these beautiful print outs! I'm sharing with friends so they can print their own, as well!
ReplyDeleteThanks to my friend Beth, I found this great blog.
ReplyDeleteHappy Thanksgiving!
So lovely, and clearly you put a LOT of time into this. Fabulous instructions that anyone should be able to follow...even me ;).
ReplyDeletexxx
Amazing, this is great as you want to learn more, I invite to This is my page. Laptops for Veterans Going to School
ReplyDeleteIn the modern digital landscape, businesses need robust IT infrastructure to drive efficiency, security, and innovation. As a leading Dell Partner in Dubai UAE TierOne provides cutting-edge Dell solutions tailored to meet the dynamic needs of businesses across industries. From high-performance laptops and desktops to enterprise-grade servers, storage, and networking solutions, TierOne ensures seamless integration, expert support, and long-term IT success.
ReplyDelete