computer

Printable Thanksgiving Thoughts

November 25, 2014

Printable Thanksgiving Thoughts


These Thanksgiving Thoughts that you can print out at your
home or office are a twist on the printables I have seen
offered by other bloggers in the past three years. 

They provide beautiful printables with color backgrounds,
fonts, etc. already built in.  But what if you are like me and
get sticker shock when you buy color cartridges for your
color printer?  I avoid printing on my color printer because
it costs so much.  Or you might only have a laser or ink
jet printer that only prints black.  

With these printables the text will be black but you provide
the color by the paper that you choose to print on. 
Most scrapbook paper is cheap compared to color cartridges.
Each of these scrapbook papers was only 18 cents a piece on sale at Michael's. 

Another advantage of this type printable is that you get to 
choose the color and feel (traditional, contemporary, etc.)
of the printable to match the decor of your home by the
paper that you choose. 

Some scrapbook papers come in the 8.5" x 11" size that most
home printers accept. There is a larger selection of papers in
most stores of the 12" x 12" size, however. All you have to do
if you like a larger size in a paper is to cut it down to the size
 of paper that will run through your computer.

Measure and draw lines on the "wrong side" of the paper
if there is one.  If the paper has a white edge for information
purposes, be sure to note that you are cutting that end off
and not the "good" end. 

I spent literally hours trying to figure out how to make a 
printable that you could just print off of the computer
screen but I was not successful. Well, you CAN print these
off of the screen without downloading them but (at least in
my trials of doing that) they were on the edges of the paper
I like to have control of the margins of the things
that I print and you probably do too. 

So, the best way to use these printables is to 
download them to your computer.  Hover over the printable
in this blog post with your computer mouse.  An option 
should come up that says "Save Image As". Click it. 
All I know is how my computer works. I hope your computer look similar 'cause I don't know
how to help you if  you need help downloading and printing these out if it is different.

If you already know how to download and print, skip the next few paragraphs. I, myself am a computer
dummy and appreciate when folks offer step-by-step computer instructions to complete a project.

For example, the printable that looks similar to a proclamation
in 1723 is titled "Thanksgiving Proclamation". You can
change the title of it for your computer, you can by typing 
another title in the "name" box. Then hit the "save" button. 

I ended up making these text printables in Pic Monkey's
"design" mode. Your computer will read the printable as
a picture in jpg. format since Pic Monkey is a photo
editing site. 

On my computer I can look at the "Download" section
to find the file on my computer...is yours the same?
I can click "show in folder" to see it's icon in the download file.

If I want to move the printable to another file so I can remember where it is easier for future use, I can highlight the individual  printable's icon in the  download file by clicking on it,  hold down the "control" key and the "c" key
  at the same  time and then hit enter.  Then go to the file that I want to move it to.
  I hold down the "control" key and "v" key at the same time and hit "enter" to move it. 

When the printable is on the screen, go to the button where
your computer says "print".  Mine is under the "file" tab. 

Since these printables are in jpg. the computer sees them as
a photo. In the screen shot below it shows me how the 
printable would look if I print it in "full page" mode:
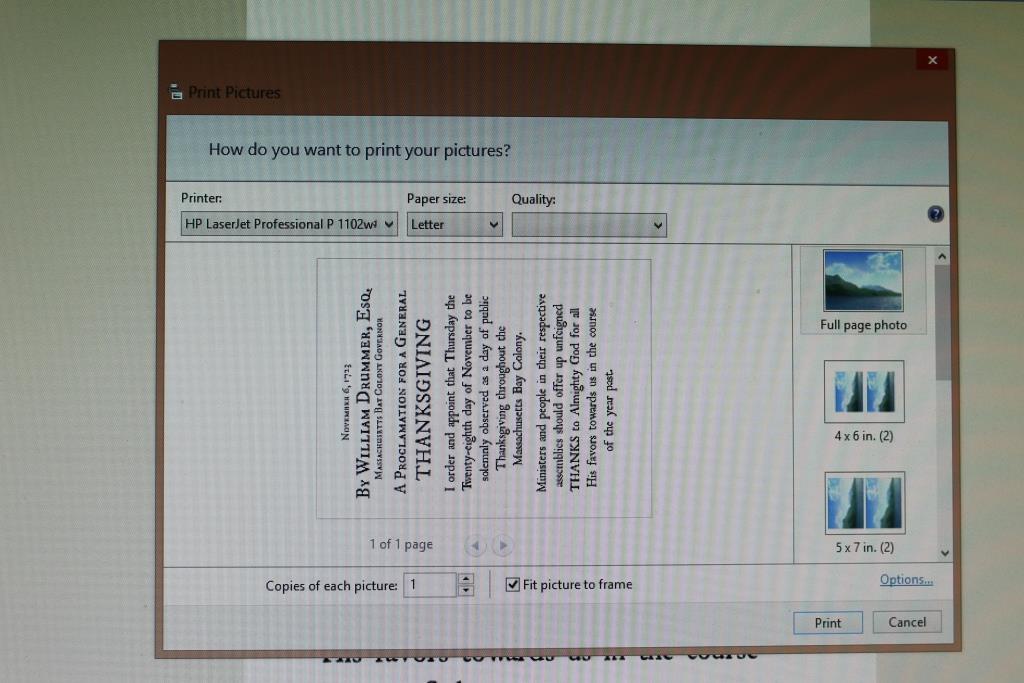

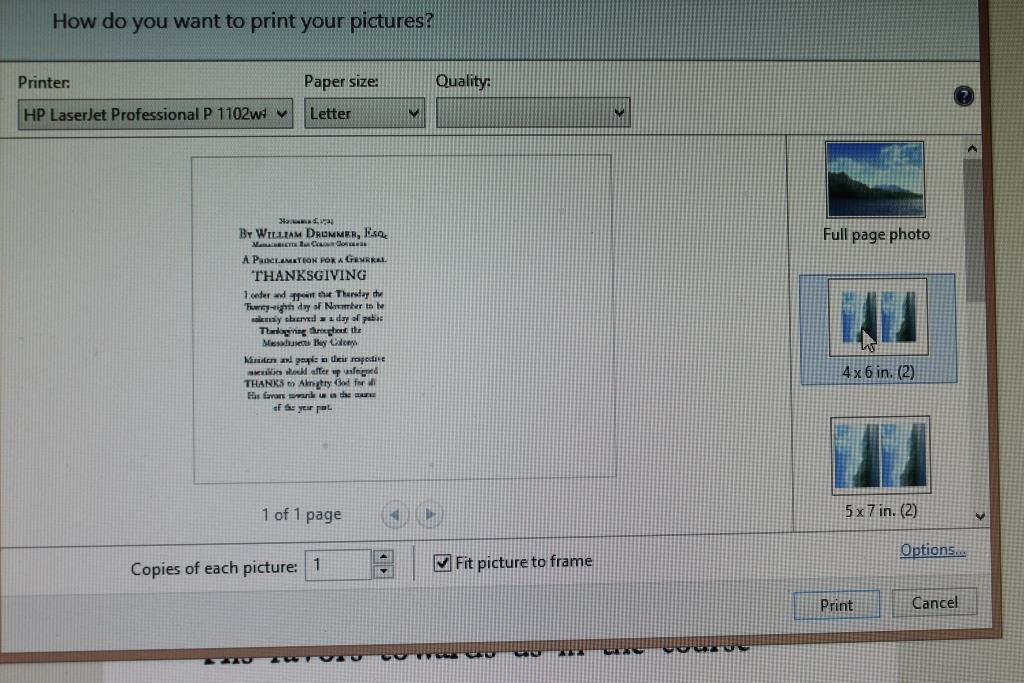
Here's how it will look on the paper if I print it as a 4"x6":


Here's how it will look on the paper if I print it as a 5"x7":

I found out that if I want the printable to be put in a frame 
that holds a 5"x7" picture, the printable looks better printed
out in the 4"x6" format so that there is some space
around the edges of the text.

Here's how the proclamation looks printed on the 
antique-looking paper as a full sheet coming off the printer:

Since the paper is 8.5"x11", it needs to be trimmed down
if it is going to be put in a frame that holds a 8"x10" photo.

Keep the paper the 8.5"x11" size to run it through the printer
so it won't slip side to side while printing and then cut it to 
the size you need if you are putting the printable in a frame. 

If you are printing the sayings/thoughts in the smaller sizes
you can get more than one on a sheet of paper if you turn the
paper on different print runs. You might want to do a test run
on a blank sheet of cheap white paper first to figure out
how to turn the paper so you don't do an over-print like this:

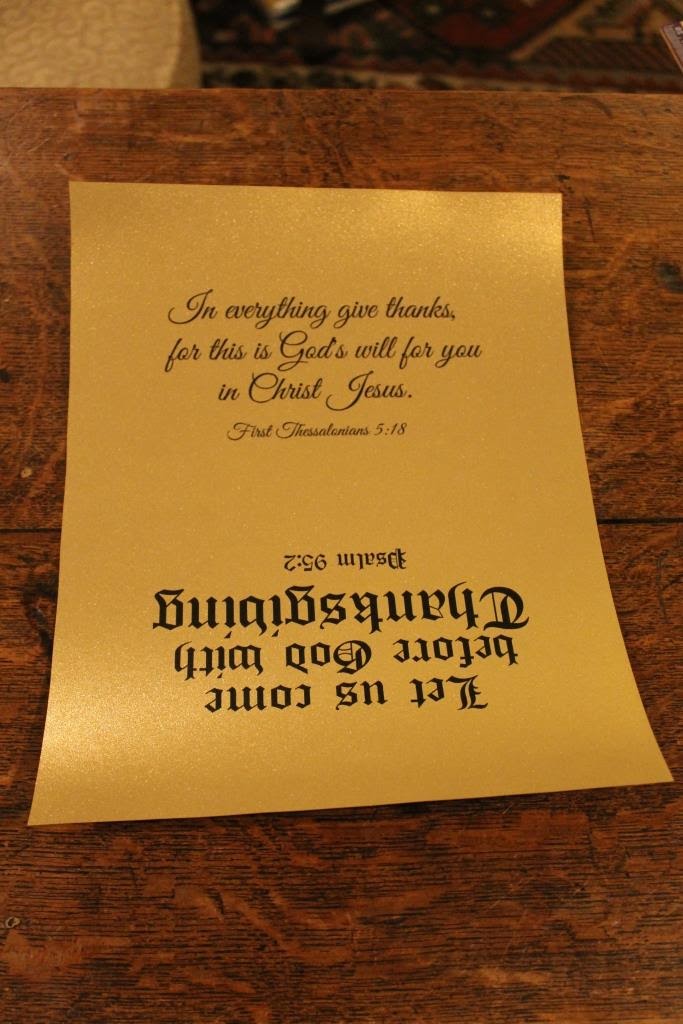
I wasn't sure that the ink would stick to the 
metallic-colored scrapbook paper but it did.

So I used the other end for another printing.
They will be cut apart and used separately.


An easy way to decide where to cut the paper to center the
text in a frame is to use the picture or cardboard filler that
comes with the frame as a template. Hold them behind the
printed out text up to a light source to see where you 
want to cut the paper.
this is a bad and fuzzy photo...I was trying to be the hand model and photographer at the same time

If the paper is too thick to use the light source trick, you can
still use the frame's original innards to help decide where
to cut your paper by moving it around on the front side.

You can vary how your printable looks by the type of paper
and frame that you choose. 


Of course, you don't have to frame the printables. You can 
prop them up against other accessories...

...or scatter them in vignettes or on your Thanksgiving table.

Here are the printables to download and use as a quick,
easy and very inexpensive way to add some last-minute
 thankful quotes/verses to your home:


.............
..........
..........
..........
..........
..........
..........
..........
.........
..........

This is my first attempt to offer printables...I hope that it
works for you...it did in my test runs.  If you want to see
the main way I used these thoughts and verses in my 
home you can click on the following highlighted
 text to see the blog post 


I hope you have a blessed Thanksgiving week!

I am sharing this post at these blog parties:
A Stroll Thru Life's  Inspire Me Tuesday
Savvy Southern Style's Wow Us Wednesday

Get More Exposure For Your Projects

October 1, 2014

Get More Exposure For Your Projects


Do you have projects or crafts that you have done and want to
share them with the world? A website called 
"Cut Out + Keep" helps you get your creativity out there.

It is an online community designed to help you make and 
share step by step craft tutorials or just feature something
you have made and a description of it. 

The site was begun by Cat Morley as a way to share her own
craft projects easily.  Her boyfriend, Tom, developed a system
where step-by-step craft tutorials could be shared on the
internet in a fast and simple way.  

They realized that the system could also be useful to other
crafters and they launched their site in 2007.  Now the site
hosts over 50,000 amazing projects from all over the world
with over 100,000 members. The site is based in Scotland. 

I was honored when Cat contacted me about being featured 
on her site.  She asked me to submit seven projects to run
over the course of a week.  This is my week!

I hope you will come over to "Cut Out + Keep" to see
made especially for Cat's site.  They are complete but
concise tutorials of some of my most popular projects. 

The ones that have been on the site so far this week are


Stop back by the rest of the week to see more!
Click on the "Superstar" tab on the header on the 
"Cut Out + Keep" website. There is also a crafty,
 a sewing, a fashion and a cooking superstar this week. 

You don't have to be asked to be on the site! It is free to join.
There are good instructions on how to make your tutorials.
When you are through with composing your tutorial you pub-
lish it on the site. Folks from around the world will see your work.

 This is a good way to share even projects
 you may have done in the past and want to re-introduce
 to a whole new audience. You probably already have the
 photos so it would be easy to write a short tutorial to go 
along with them.  There are also chat boards on the site.

The site is very interesting because it is truly global and there
are a wide variety of projects posted there: art, decorating, beauty,
recipes, home and DIY, jewelry, needlework, paper crafting, 
sewing, yarn crafting and more.  You can find a category to 
fit your specialty! Cut Out + Keep  also is on Pinterest with 24 
different boards of some of their favorite projects. 

Come on over and share your projects in an easy way
with the world!

I'm sharing this post at
Ivy and Elephant's What's It Wednesday

How To Enlarge An Image

March 7, 2013

How To Enlarge An Image


Want to know how to enlarge images to use in
do it yourself projects?

  I stumbled across a great free website that easily 
enlarges images for you.  It was featured by Karen at
The Graphics Factory blog in 2011 so lots of folks
probably already know about The Block Poster website
but this was new info to me and maybe it is to you too.

For St. Patrick's Day decor in my dining room, I had been
planning on making a faux stained glass window depicting
Saint Patrick, himself.  I was dreading trying to draw the
stained glass window (that I found a picture of online to copy)
 to be large enough to fit in the frame needing a new subject.
 This stained glass window is in St. Anthony of Padua
 Church in West Orange, New Jersey. 

It depicts Saint Patrick, the patron saint of Ireland.  
Historians think that Patrick preached the Christian
 gospel to the people of Ireland in the 5th Century. 
 At that time, many Irish were pagan or Druid worshippers.  
Patrick taught the theology of God being the Father,
the Son and the Holy Spirit using the three leaves of the
shamrock, a familiar plant to the Irish, as a visual example.

Using Block Poster it was very easy to make St. Patrick larger
 (and I'm a computer dummy).

In Step 1 you upload your image to their website.
Tell the program if you want the image to be "portrait"
(or vertical) or "landscape" (or horizontal).


In Step 2 you determine how large you want your final image
 to be. The website calls them "slices" but for me it was easier 
 to think of them as 8.5" x 11" pieces of copy paper because
 that's how the image will be "delivered" to you on your printer.


At first, I tried 4 "slices" across but in doing the math,
that would have made my image 34" wide and the frame
is only 24" wide.  It was easy to adjust the "slices" to be
3 across.  That way my image would fit in the frame and
I could just add something to the sides to fill it out.
The program does tell you the approximate size 
your image will be after it is pieced together. 


  In Step 3 the larger image is downloaded back to you and
  your printer gets to work printing out the image page by page. 

I only wanted the image to use as a guide so I printed
 it on the laser printer in black and white and not on
the color printer but you can print your image in color.

  The image prints out with white borders so you will
need to cut those off and tape the pieces of paper
together (if your image is larger than 8.5" x 11").

Here is the image with the horizontal borders cut off...


...and with all the interior borders cut off... making sure
the image will fit on the acrylic in the frame I purchased. 

For a base for the actual "stained glass" I thought that plastic
would be lighter to work with than a sheet of real glass.
A home improvement store did have some acrylic sheets
that could be cut to size but I was shocked at the prices.
A cheaper alternative was a poster frame on sale at
Michael's.  It was only $12.50 and already the correct size.

The only part of the frame that I was going to use was the
acrylic sheet.  You could put a faux stained glass project back
into the original framing pieces but you would have to be careful
not to let too much paint come to the edge of the acrylic so the
 black rails could still fit on top and hold everything together.

Making sure the acrylic does in fact fit in the frame I have:
The acrylic has a protective plastic coat on it...be sure you
pull it off the side you will be putting the paint on.

"It's a sign."  I love that quote from "Sleepless In Seattle".
I took it as a good "sign" that I found a piece of paper in a
box that had been mailed to me that was the perfect size
of the frame's interior (and of the acrylic sheet). 

 I needed that paper to extend the lines of the stained glass
 because my image was a little smaller than I actually needed.

 To simplify the design some, I decided not to do the
 intricate stained glass pieces around 
St. Patrick's head (red in the original image).
To take their place, I  just extended the diamond shapes
to go behind him. I used a white crayon to draw those lines
 on the dark parts of the image so I could see them easily.

For my purposes, the image was taped under the acrylic
to more or less trace it with the black leading paint.
If you are using the Block Poster image to transfer wording, etc.
onto a piece of wood or paper, you would place the image on top
and use some type of carbon paper to trace over the image.

The first step in the faux stained glass process is to draw
the faux leading lines with the special paint.
I thought I was being careful not to cut too much off of
the tip of the paint bottle but I did anyway.  The paint came out 
thicker than I wanted it...let that be a lesson to you. 

Anyway, just trace over the different elements of the main
parts of the design with the liquid leading.  It needs to dry 
before you start adding the fill colors.  

I thought I was taking good pictures of the whole painting
process but from this point on but the memory card was out
of my camera!  That's OK...I don't know what I'm doing 
anyway...it was trial and error.  There are good tutorials on
faux stained glass painting online for you.  In retrospect, here
is a photo of the paints that I did use in the project:

Gallery Glass paints are available at most craft stores.
 The Martha Stewart craft paint line came out with a paint
called "liquid fill" last Fall which worked really well for
the project too.  It is thinner than the Gallery Glass paints
so it fills in a area easily but another type of MS paint 
would probably be better if you are working on a vertical
surface.  The "fill" paint needs boundaries unless you want
it to completely cover a surface.

Also pictured with the paints above is a paint pen.
This was used to mimick the smaller lines in the original
stained glass piece that were not leaded (like the eyes, etc.)

Now that the memory card is back in the camera,
here's a photo of the (mostly) finished project:


Some of the colors were changed from the original.
I still have not finished St. Patrick's face.  The flesh tone
 paint that I used on his hands looks at little too much like a 
tan from a bottle so I put it only lightly on his face.
It looks OK when there is something white behind him but
 he is going to be on a green wall and then his face looks green.

For the time being, I cut out a piece of orange vellum to 
put behind his face until I can learn how to give him good color.

Before I put St. Patrick in the heavy frame, I held him
up to a sunny window to see what he would look like if he 
was really being used like a stained glass window.

My favorite places on the window were areas where two
shades of a color were marbleized together.


St. Patrick got secured in the frame with black electrical tape.
I thought that if any of it showed, it would look like leading.

Here he is on the wall:

I painted the hanging wires green but I didn't paint 
them light enough not to show...need to fix that.


I learned a lot about enlarging an image and making faux
stained glass for this St. Patrick's Day project and will try
both processes again sometime. 

I'm sharing this post over at
Flaunt It Friday @ Chic On A Shoestring
Inspire Me Please @ Liz Marie Blog
Feathered Nest Friday @ French Country Cottage
Be Inspired! @ Common Ground 
What's Shakn' Link Party @ Shaken Together
Weekend Bloggy Reading @ Serenity Now
Sunday Showcase Party @ Under The Table and Dreaming
Metamorphosis Monday @ Between Naps On The Porch
Tabletop Tuesday @ A Stroll Thru Life
Wow Us Wednesday @ Savvy Southern Style
© Miss Kopy Kat. Design by FCD.